

Set up GP Connect appointments in EMIS
There are 5 steps you need to follow:
- Create or edit a slot type
- Create an organisation group
- Set up the clinician role
- Create or edit a session
- Add slot type to a target in Appt Health
Step 1: Create or edit a slot type
Set up a slot type and enable Appt Health to find it through GP Connect.
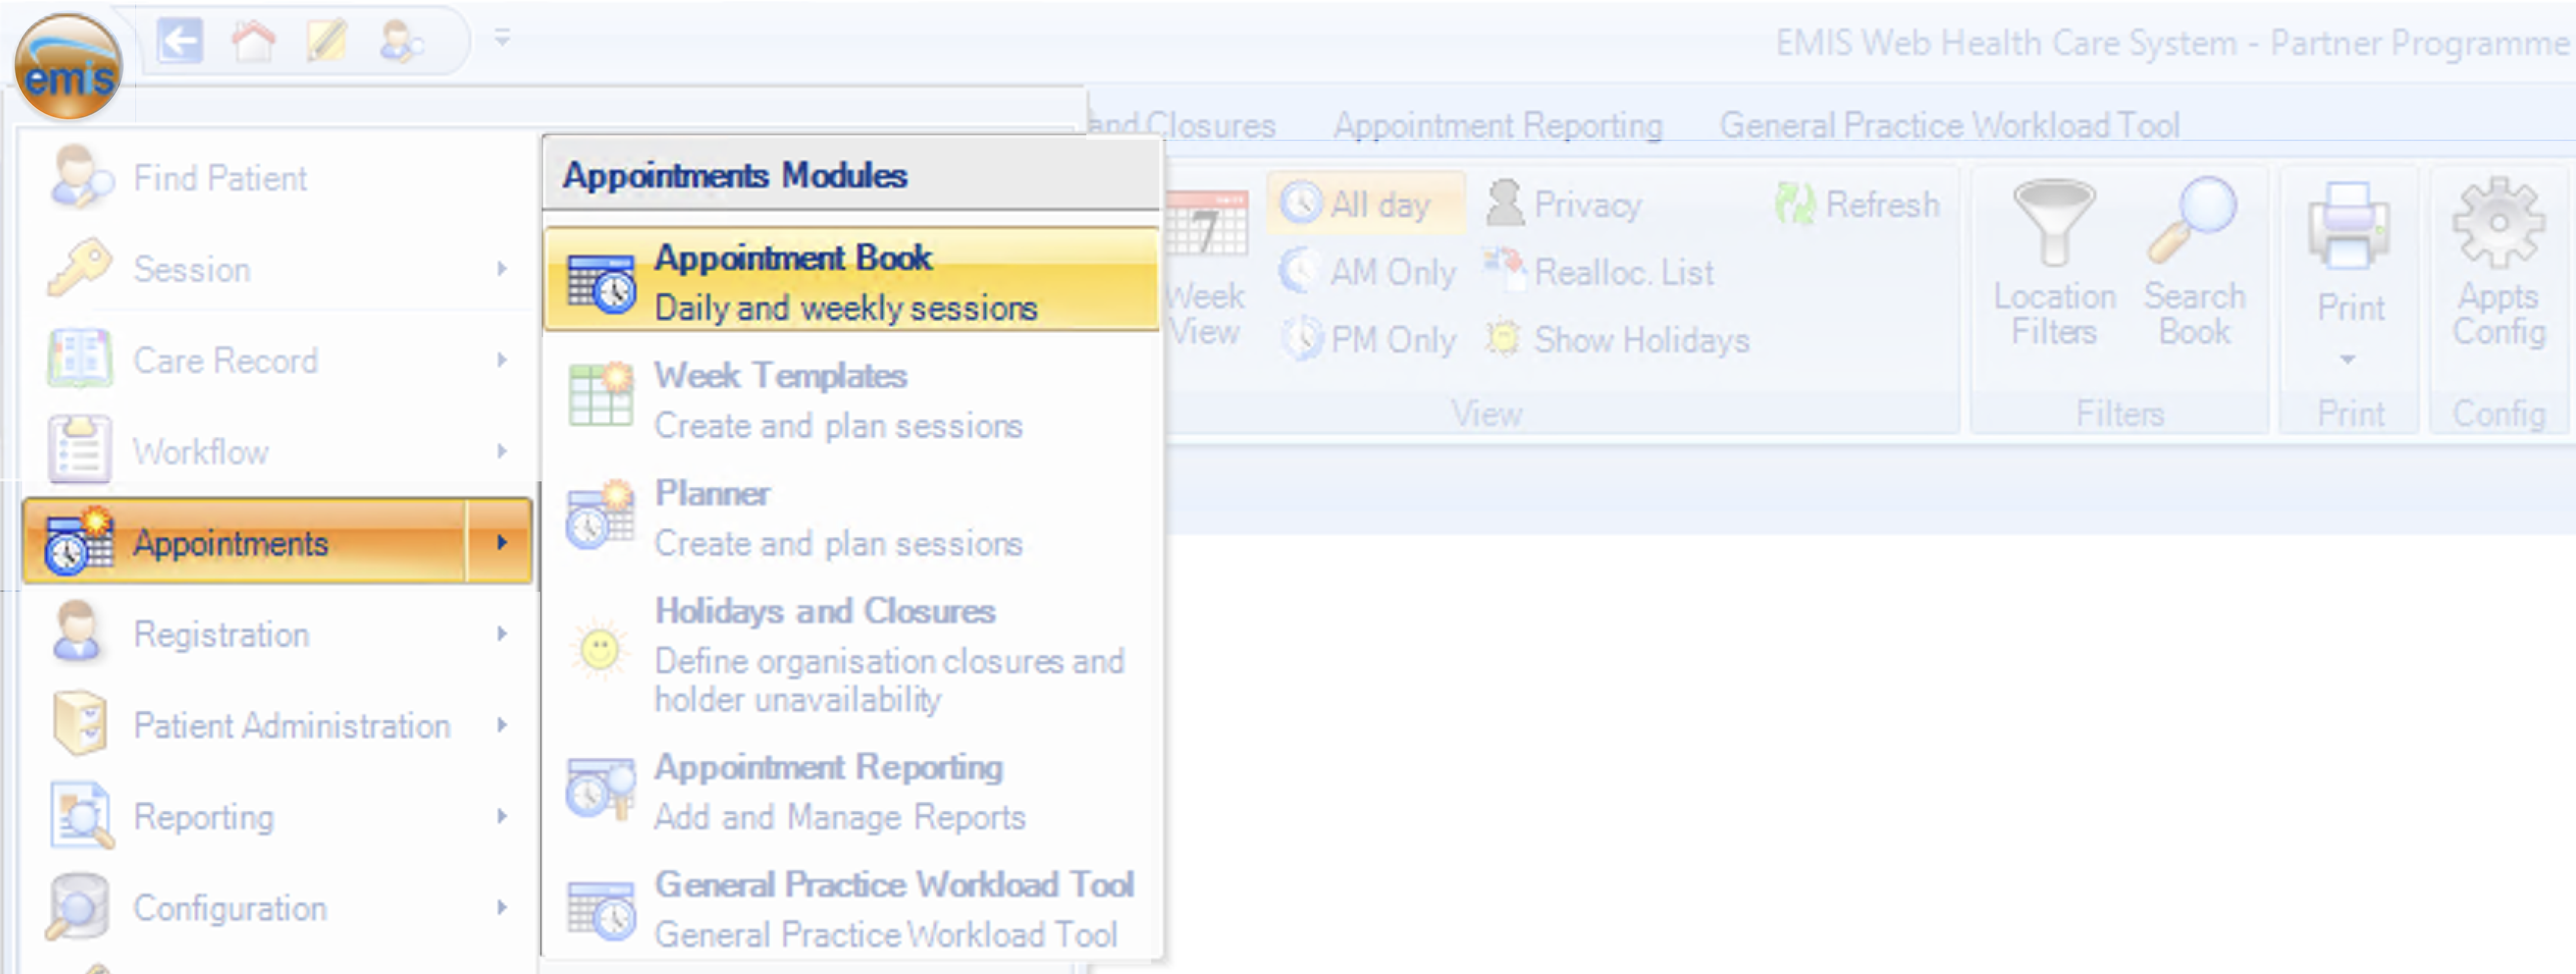
1.1 Go to 'Appointment Book'
Click on EMIS bubble in the top left corner, them select 'Appointments' and ‘Appointment Book’

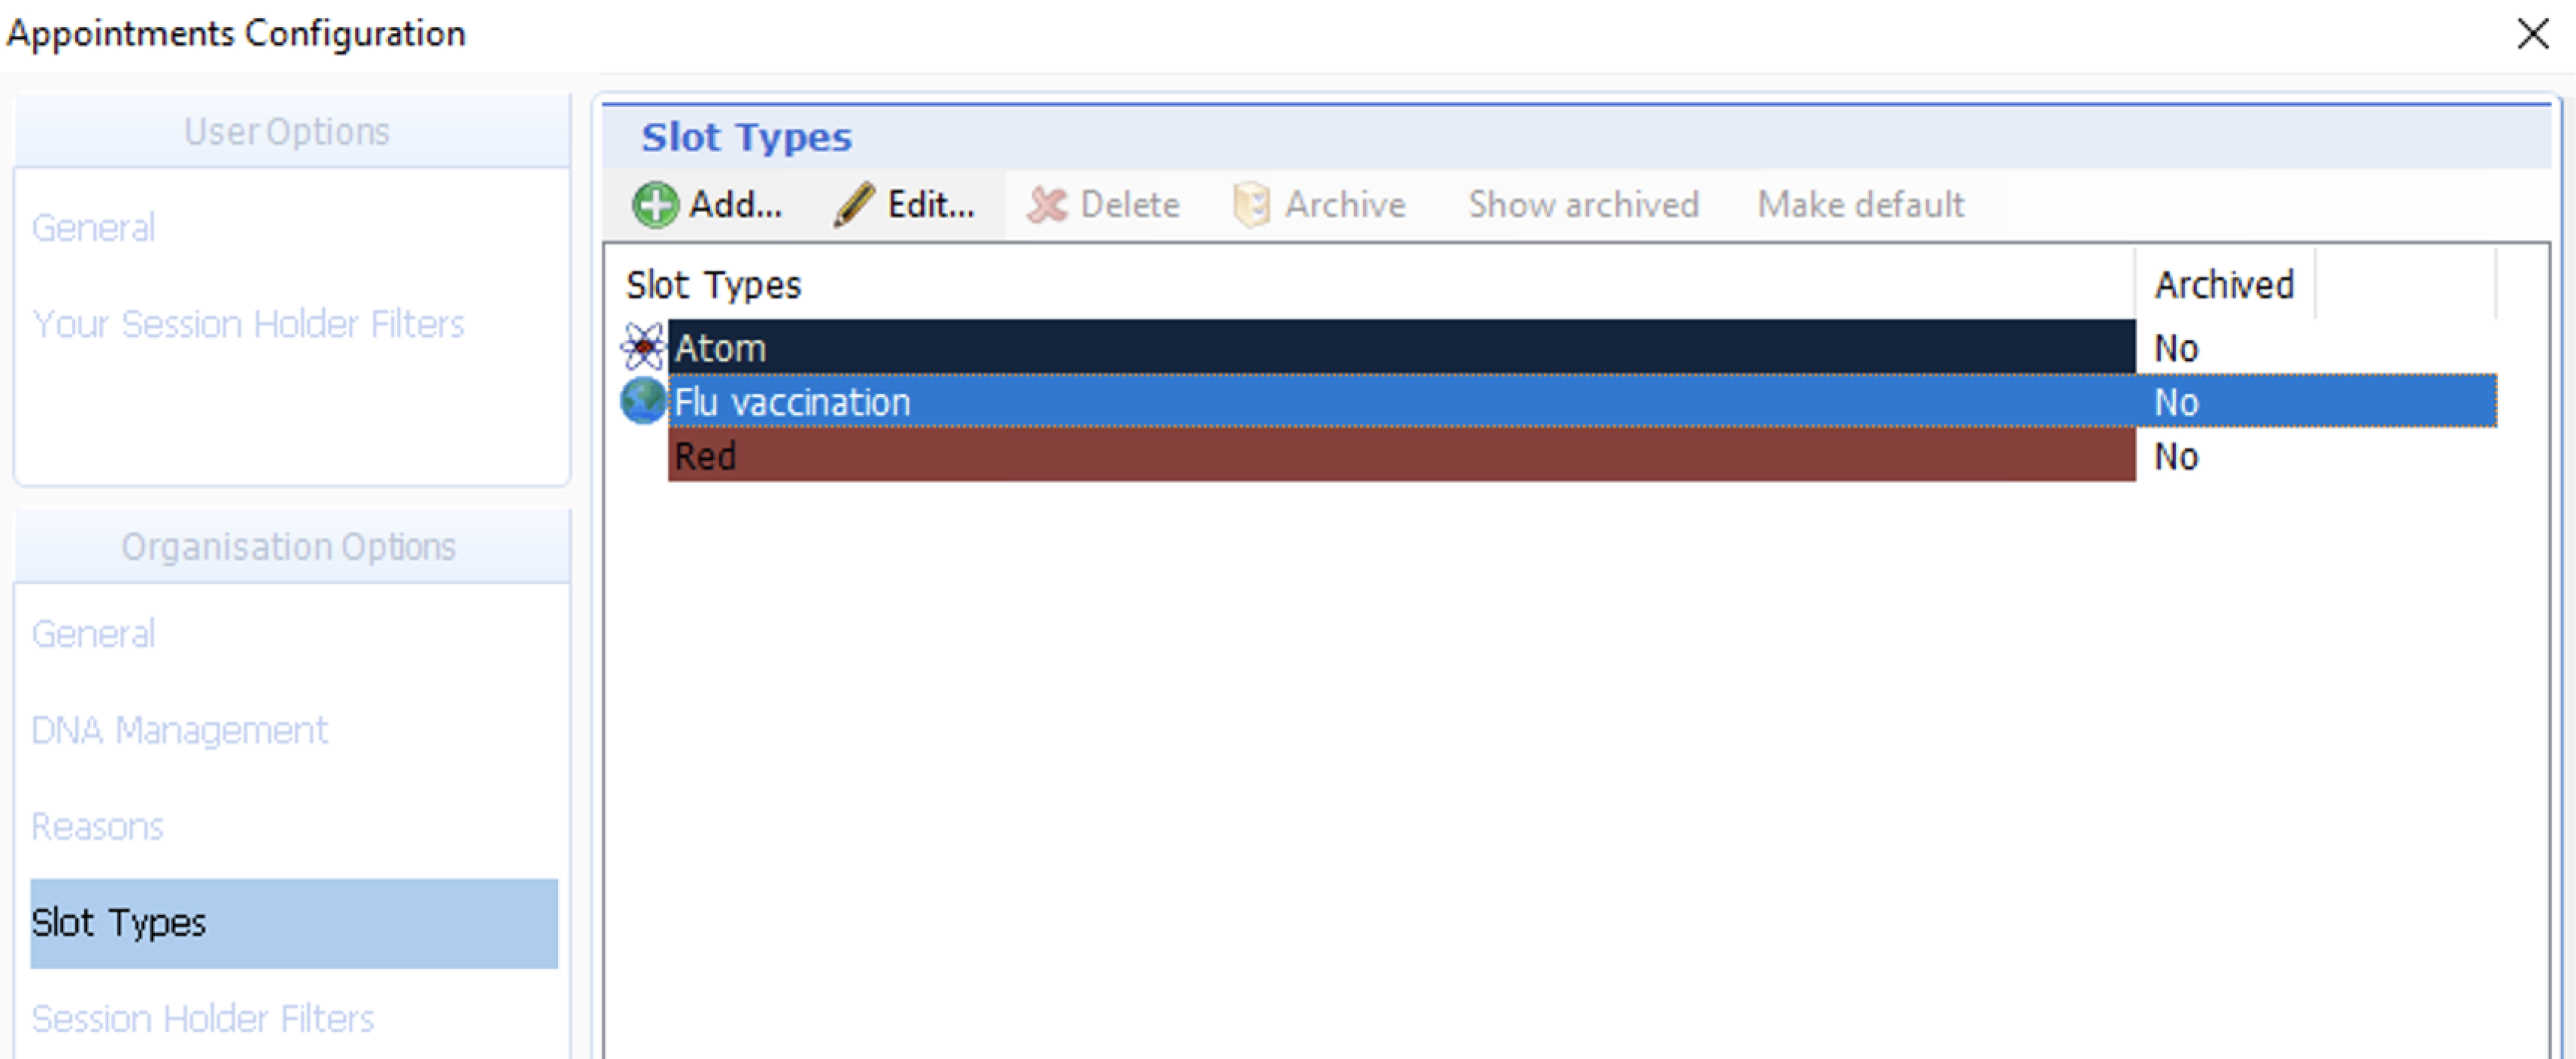
1.2 Select 'Appts Config' in the right corner

1.3 Select 'Slot Types' and then either edit an existing slot or click 'Add' to create a new one
1.4 Fill out details
- Name: Name of slot type
- Bookable Slot: Must be ticked
- Status Type: Select type e.g. face-to-face, telephone etc
- Colour: Choose any you like
- Allow auto DNA: Can be ticked or left
- Send notification: Can be ticked or left
- Icon: Choose any you like.
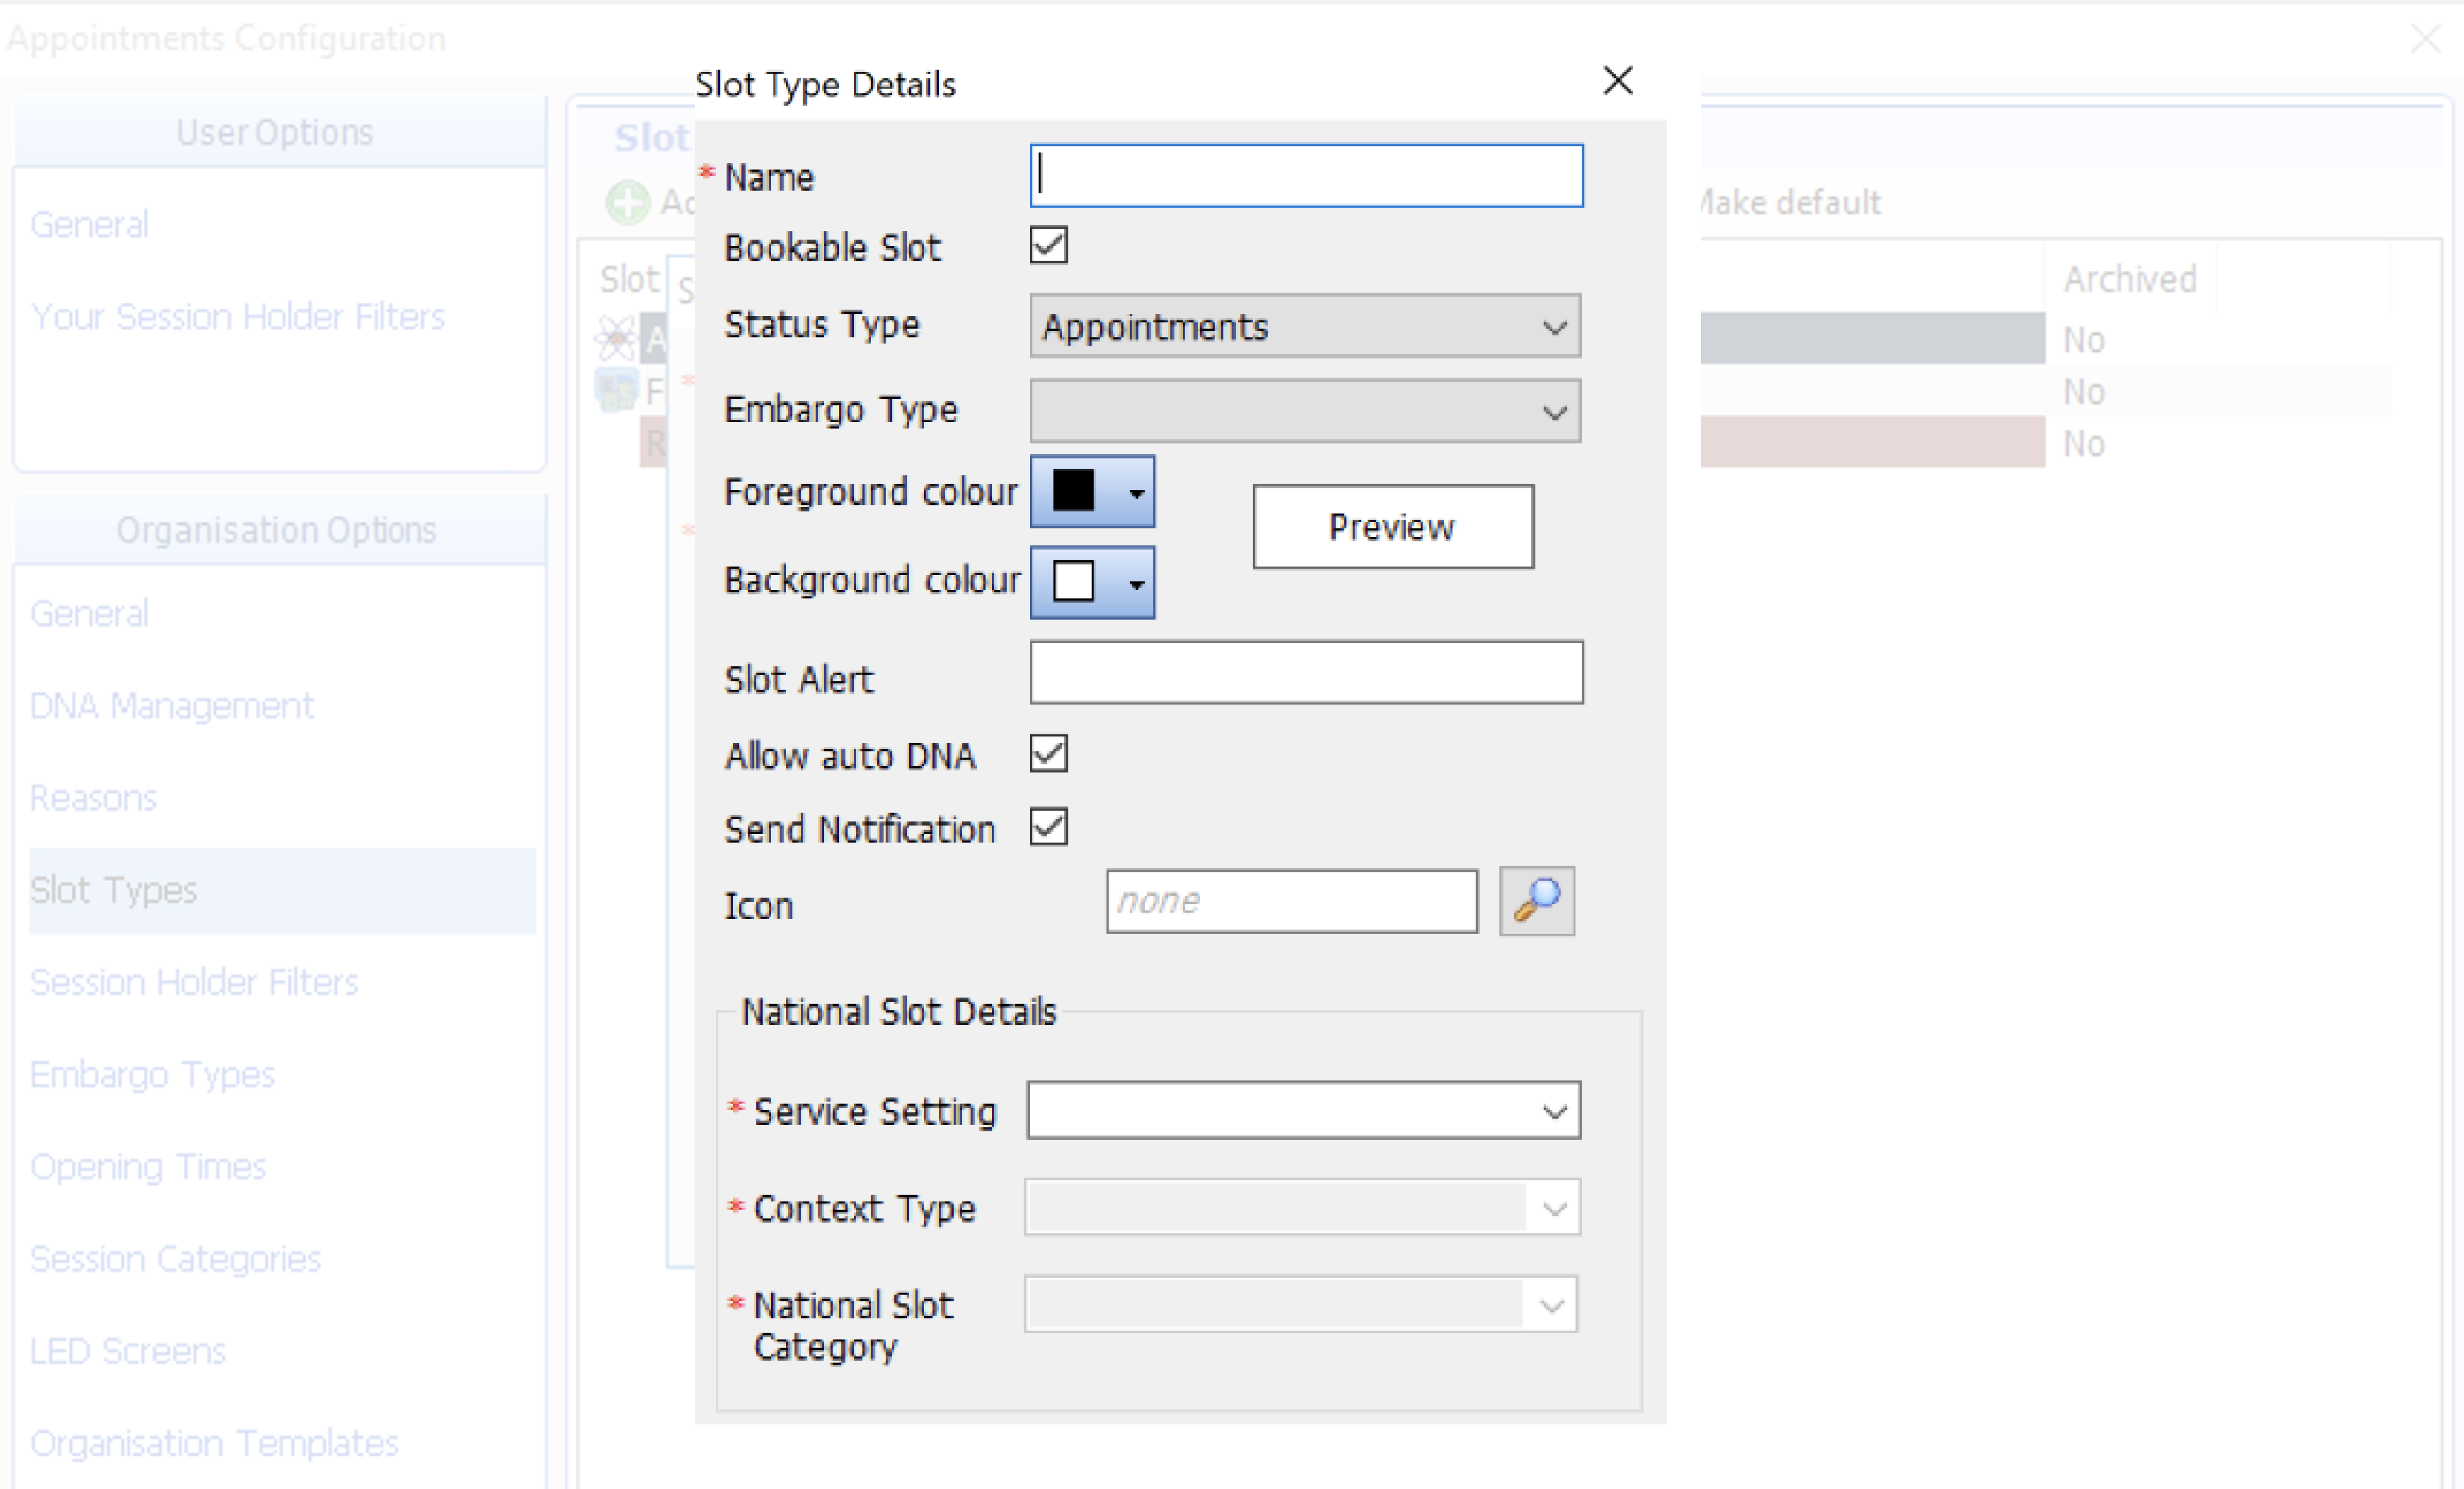
Click 'Ok' to save these details and to complete step 1.
Step 2: Create an organisation group
This is really important for making sure that NHS 111 do not book the appointments we are opening up for GP Connect booking.
If you have previously set up an organisation group for Appt Health then you can use the same group for all Appt Health slots you're setting as available for GP Connect booking.
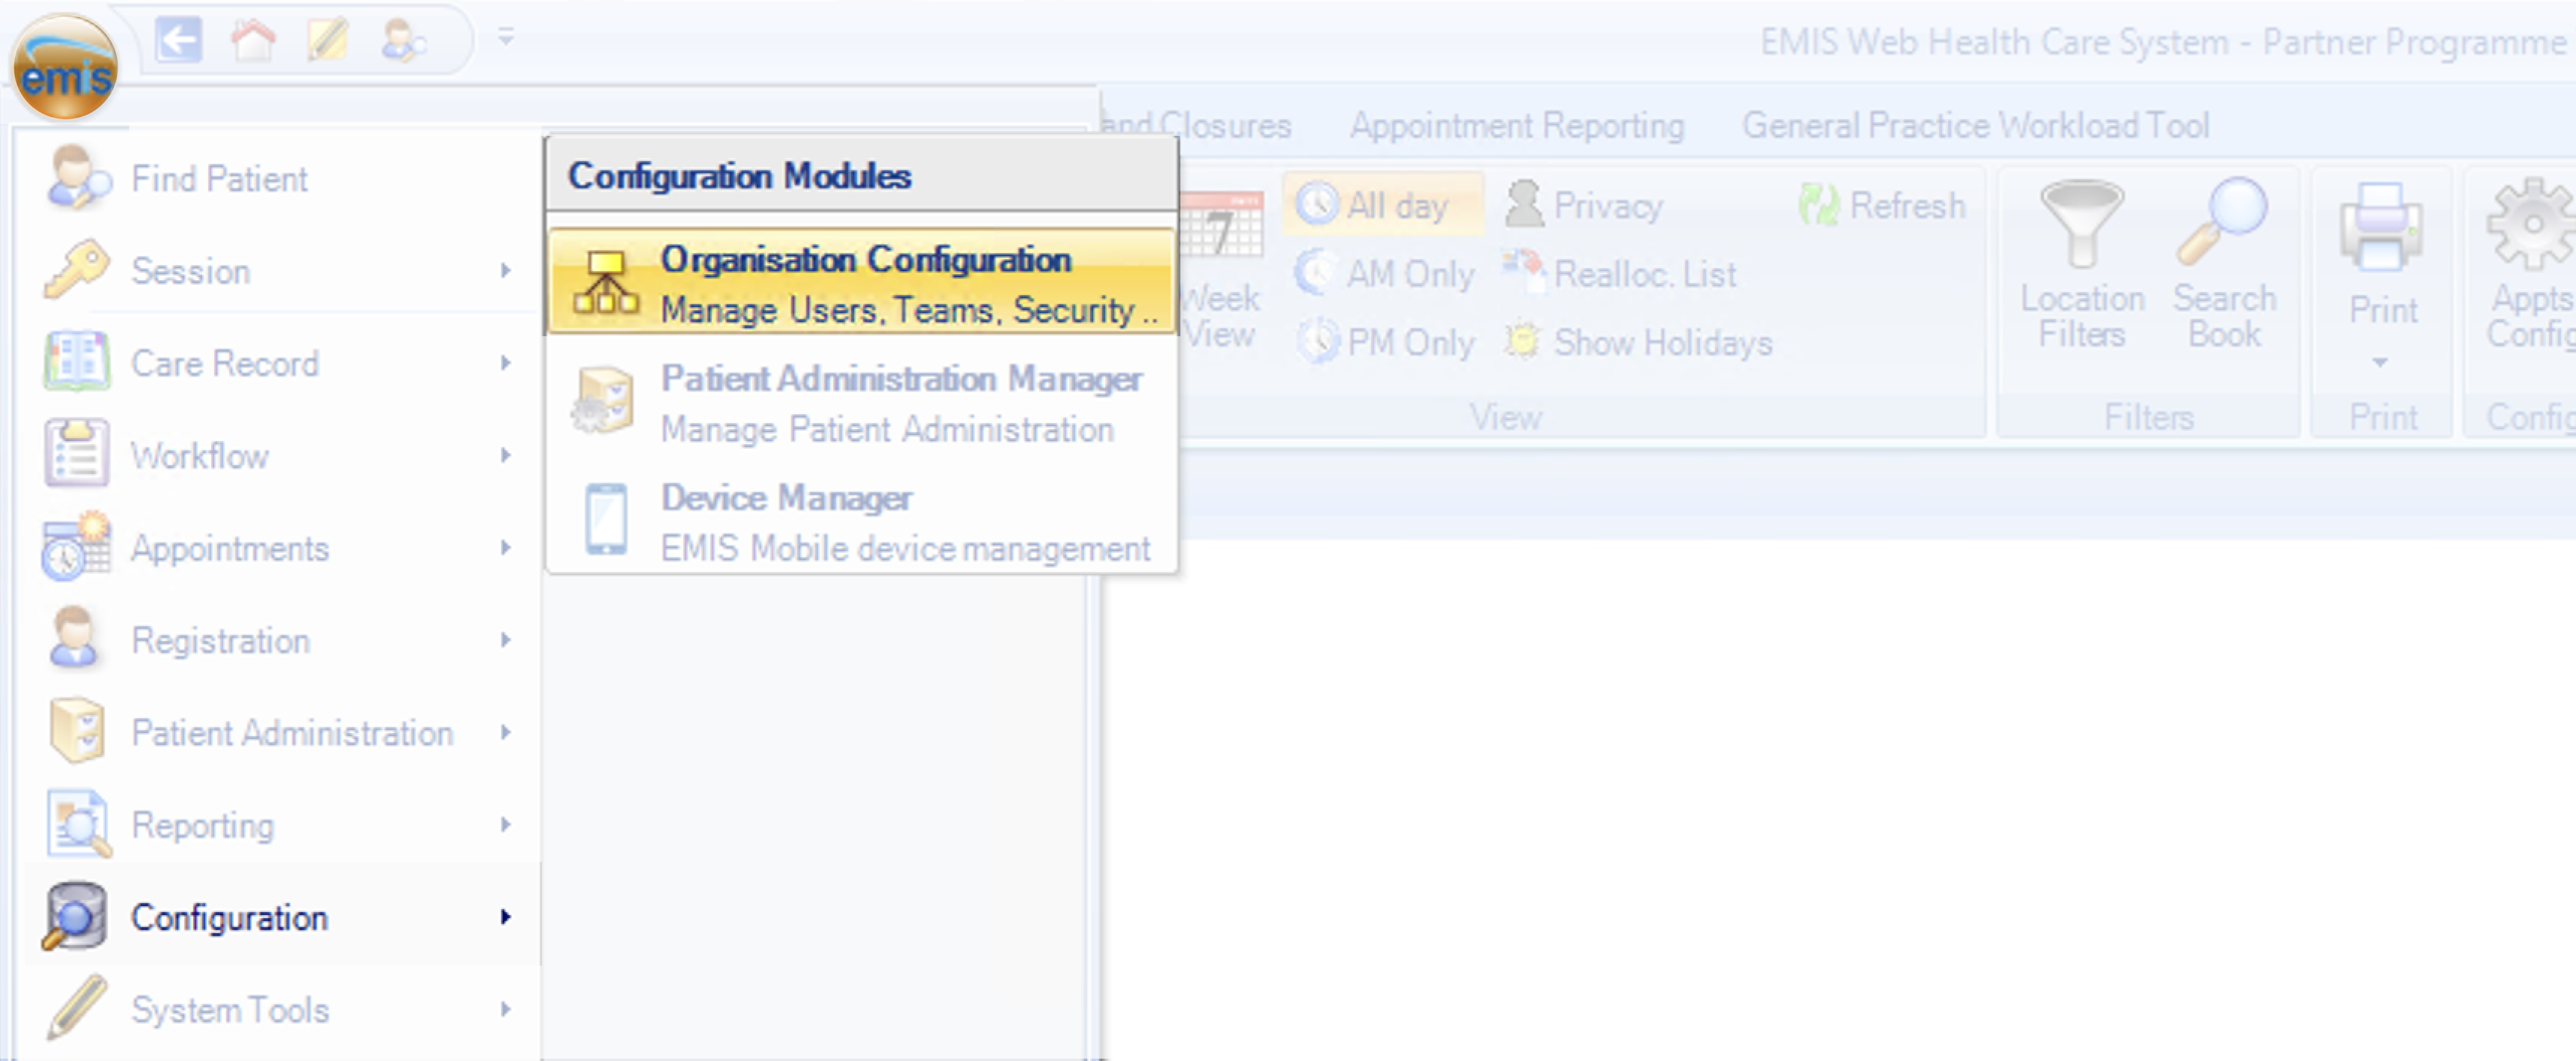
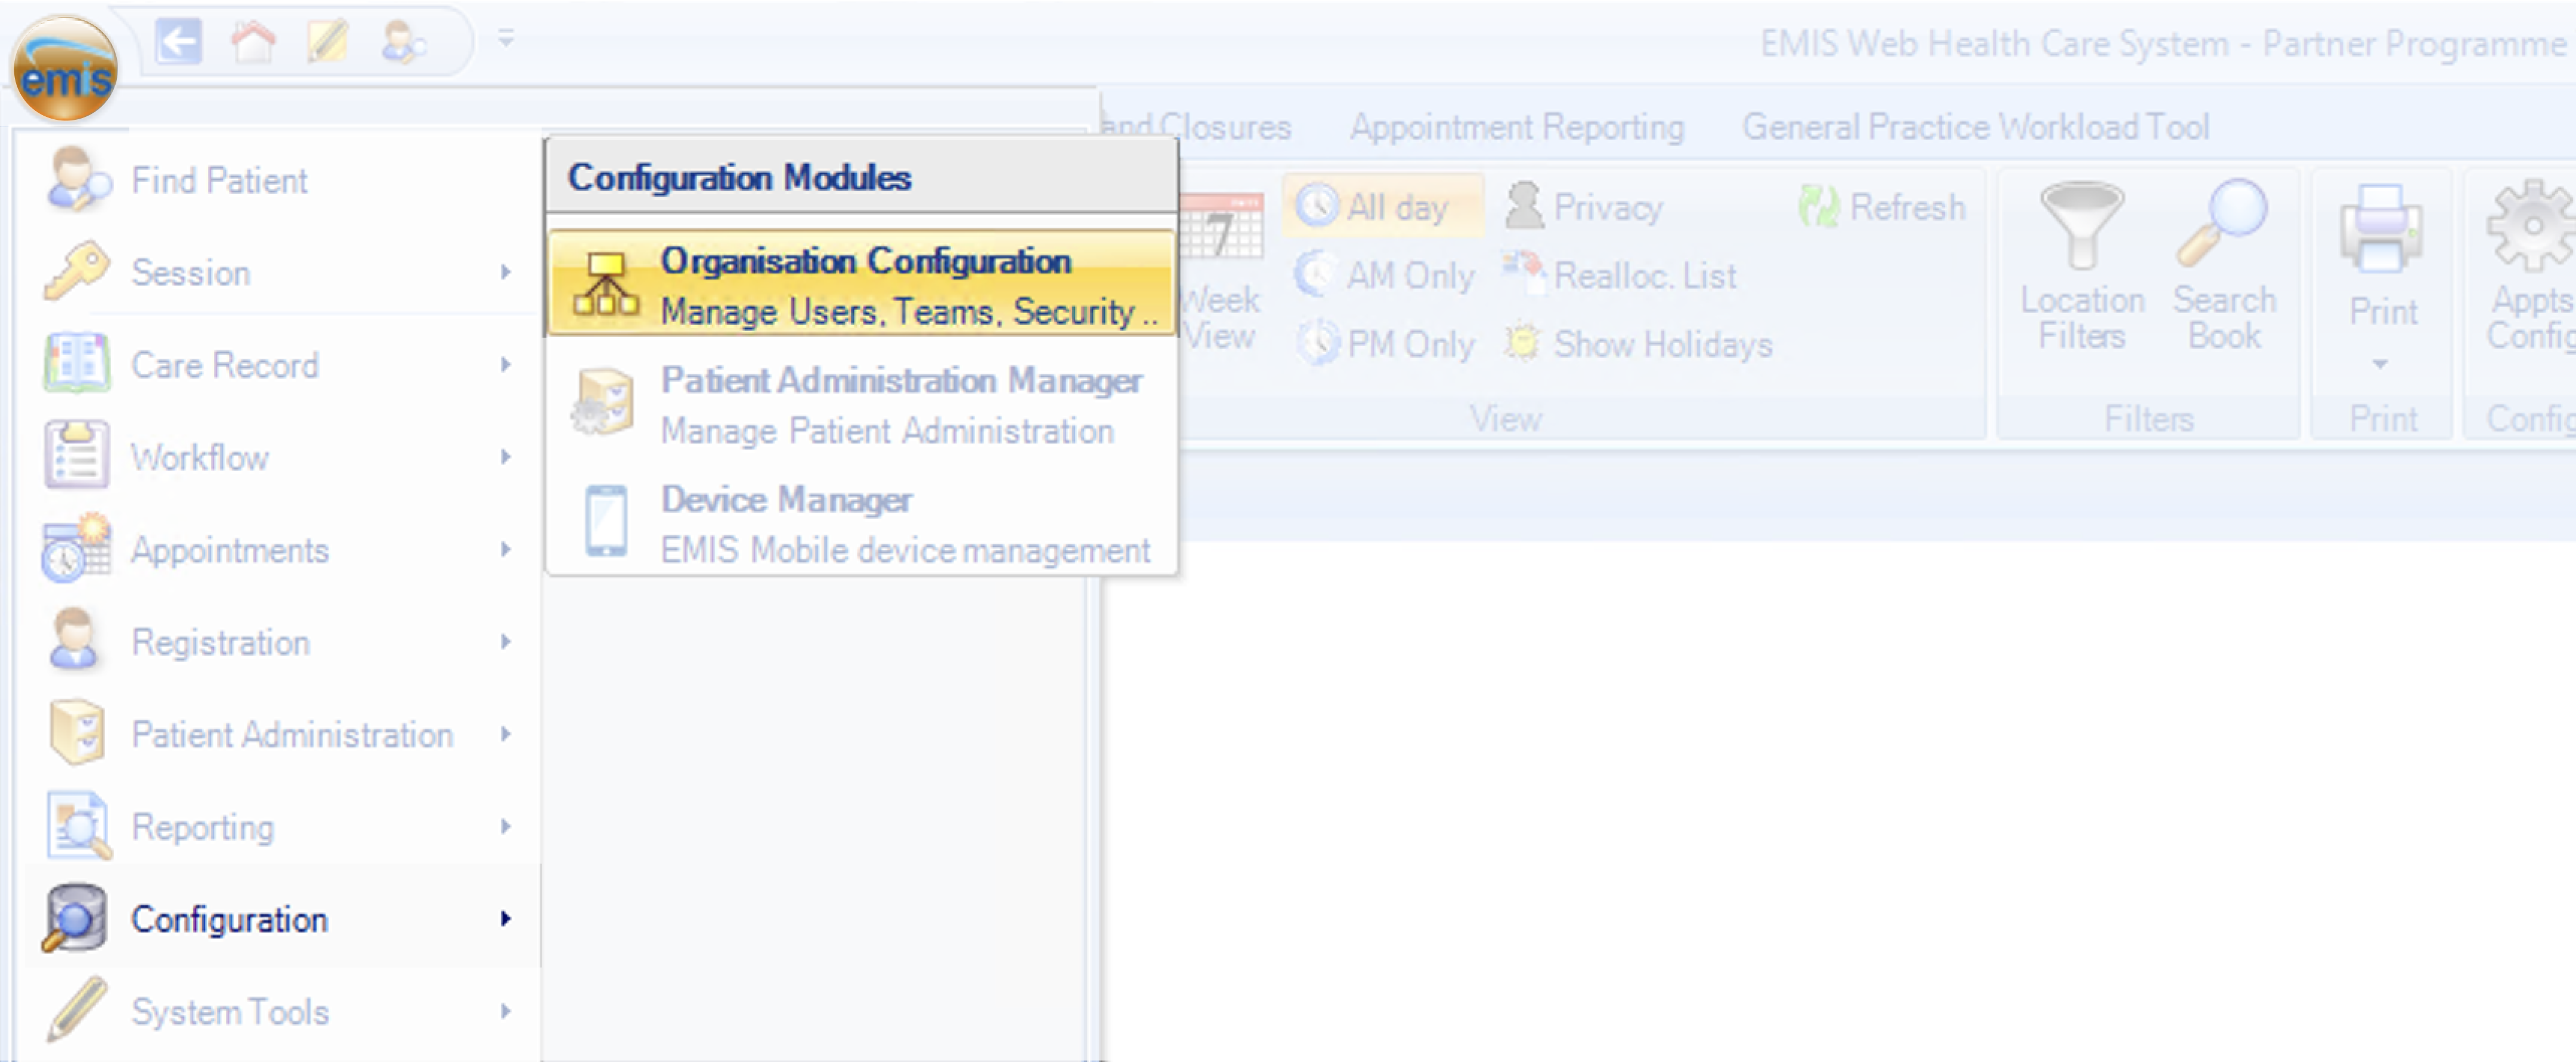
2.1 Go to 'Organisation Configuration'
Click on EMIS bubble in the top left corner, then select 'Configuration' followed by 'Organisation Configuration'.
2.2 Click 'Organisation Groups' in the bottom left corner

2.3 Select 'Add' in the top left corner

2.4 Fill out details
- Organisation group name: Name the group something suitable e.g. General Practice Appt Health
- Description: If you need, add a description of the organisation
- Organisations: Search for Appt Health's ODS code 8JX33
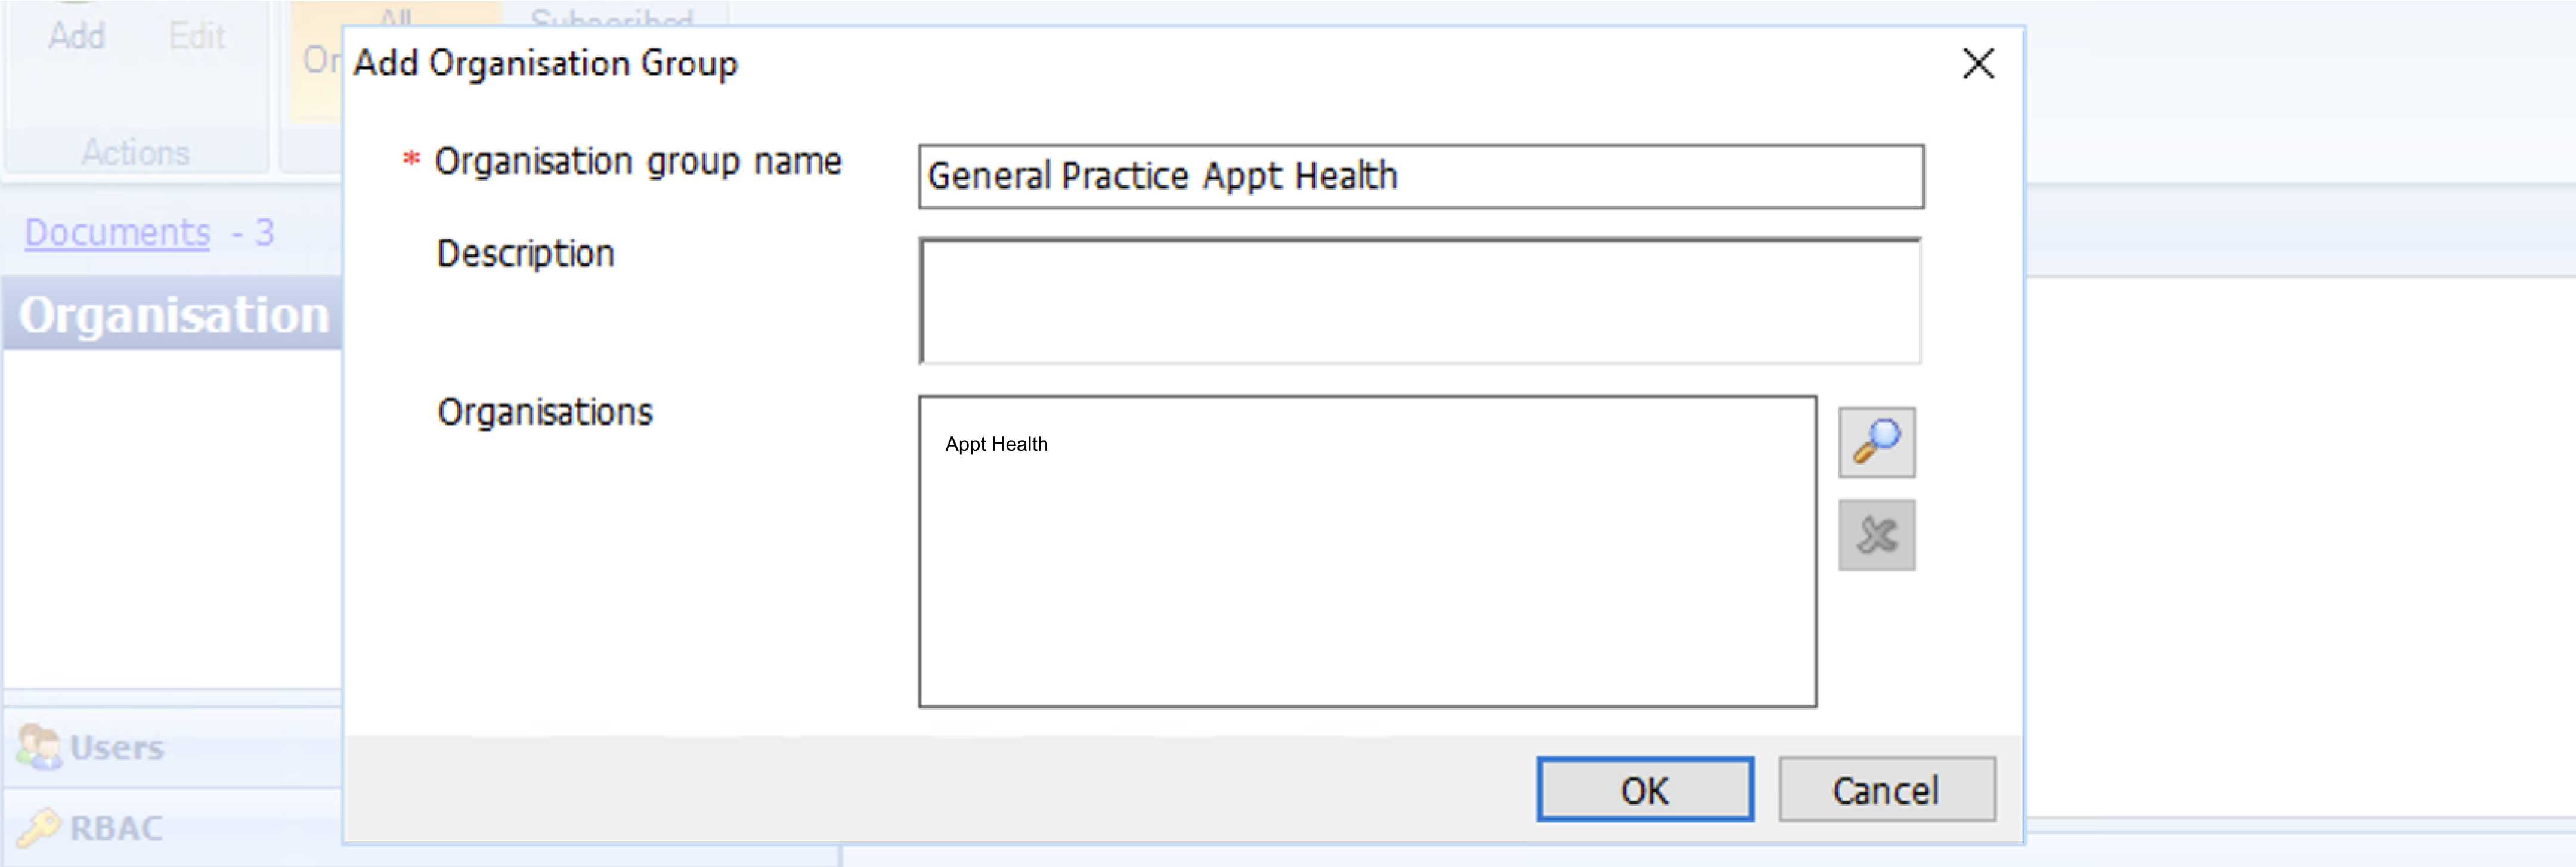
Click 'Ok' to save these details and to complete step 2.
3. Set up the clinician role
This step is important for ensuring that NHS 111 do not book the appointments we are opening up forGP Connect booking.
3.1 Go to 'Organisation Configuration'
Click on EMIS bubble in the top left corner, then select 'Configuration' followed by 'Organisation Configuration'.
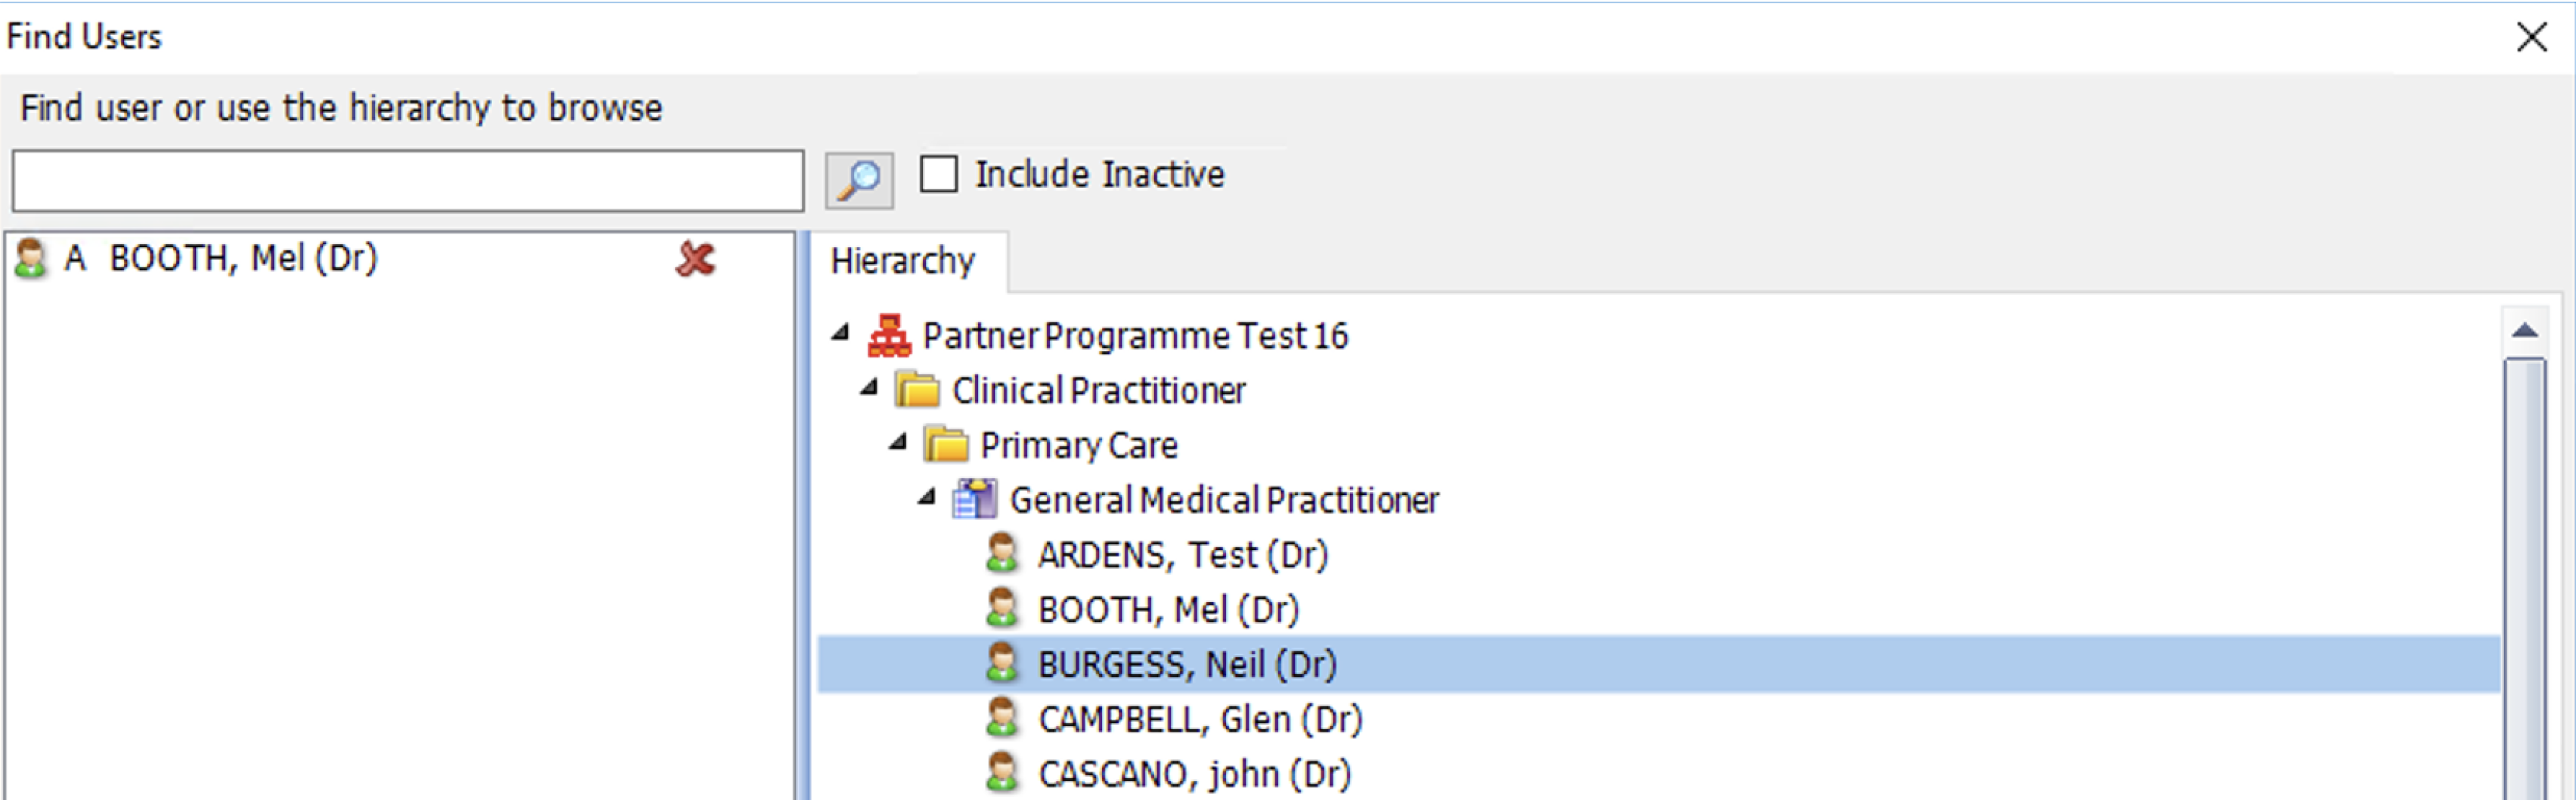
3.2 Select 'Users' in the bottom left corner

3.3 Select 'Search' in the top left corner

3.4 Select the user you want to assign this session to and click 'Ok'
3.5 Select 'Role' on the left side menu

3.6 Make sure 'Job Category' is one of the options listed below:
- General Medical Practitioner
- Salaried General Practitioner
- Student Practice Nurse
- Specialist Nurse Practitioner
- Sister/Change Nurse
- Staff Nurse
- Midwife
- Community Nurse
- Dietitian
- Pharmacist
- Psychotherapist
- Clinical Psychotherapist
- Social Worker
- Healthcare Support Worker
- Healthcare Assistant
- Counsellor
- Phlebotomist
- GP Registrar
- Sessional GP
3.7 Set 'Patient Facing Services Booking' to 'All Appointments'

Click 'Ok' to save these details and to complete step 3.
4. Create or edit a session
This is the final step, and is where we set the actual appointment slots available for GP Connect booking by Appt Health. Repeat this process for all session templates that you wish Appt Health to book into.
4.1 Go to 'Appointment Book'
- Click on EMIS bubble in the top left corner
- Select 'Appointments, followed by 'Appointment Book'.
4.2 Select 'Create Session'

4.3 You can choose between 2 options
- Creating a new session
- Editing an existing session
4.4 Option 1: Creating a new session
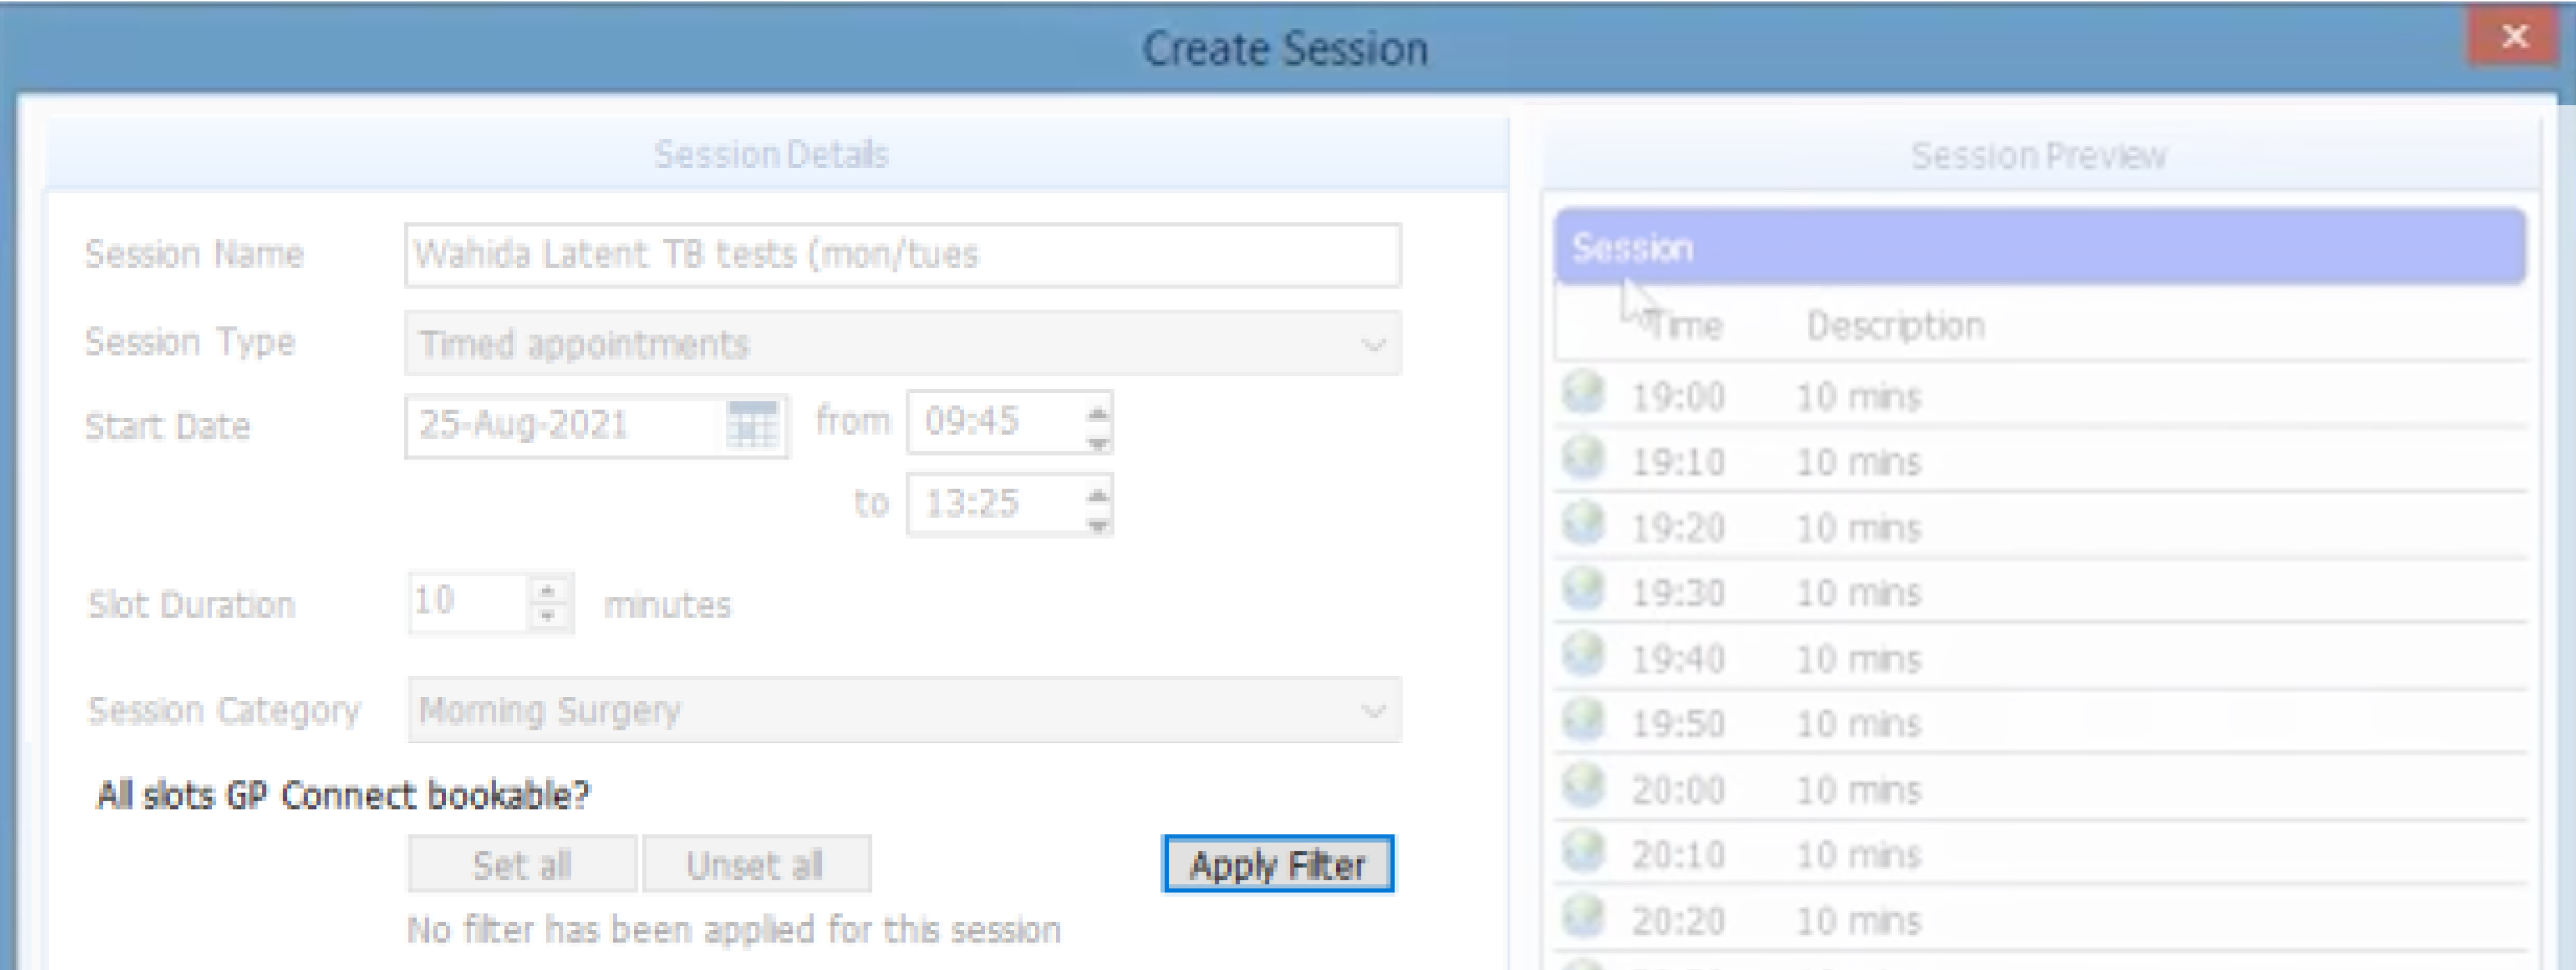
4.4.1 Set up session
- Session Name: Give it an appropriate name
- Session Type: Set as 'Timed appointments'
Otherwise, set it up as you prefer. You might now see that 'All slots GP Connect bookable' is greyed out. Do not worry about this, carry on with the tutorial.

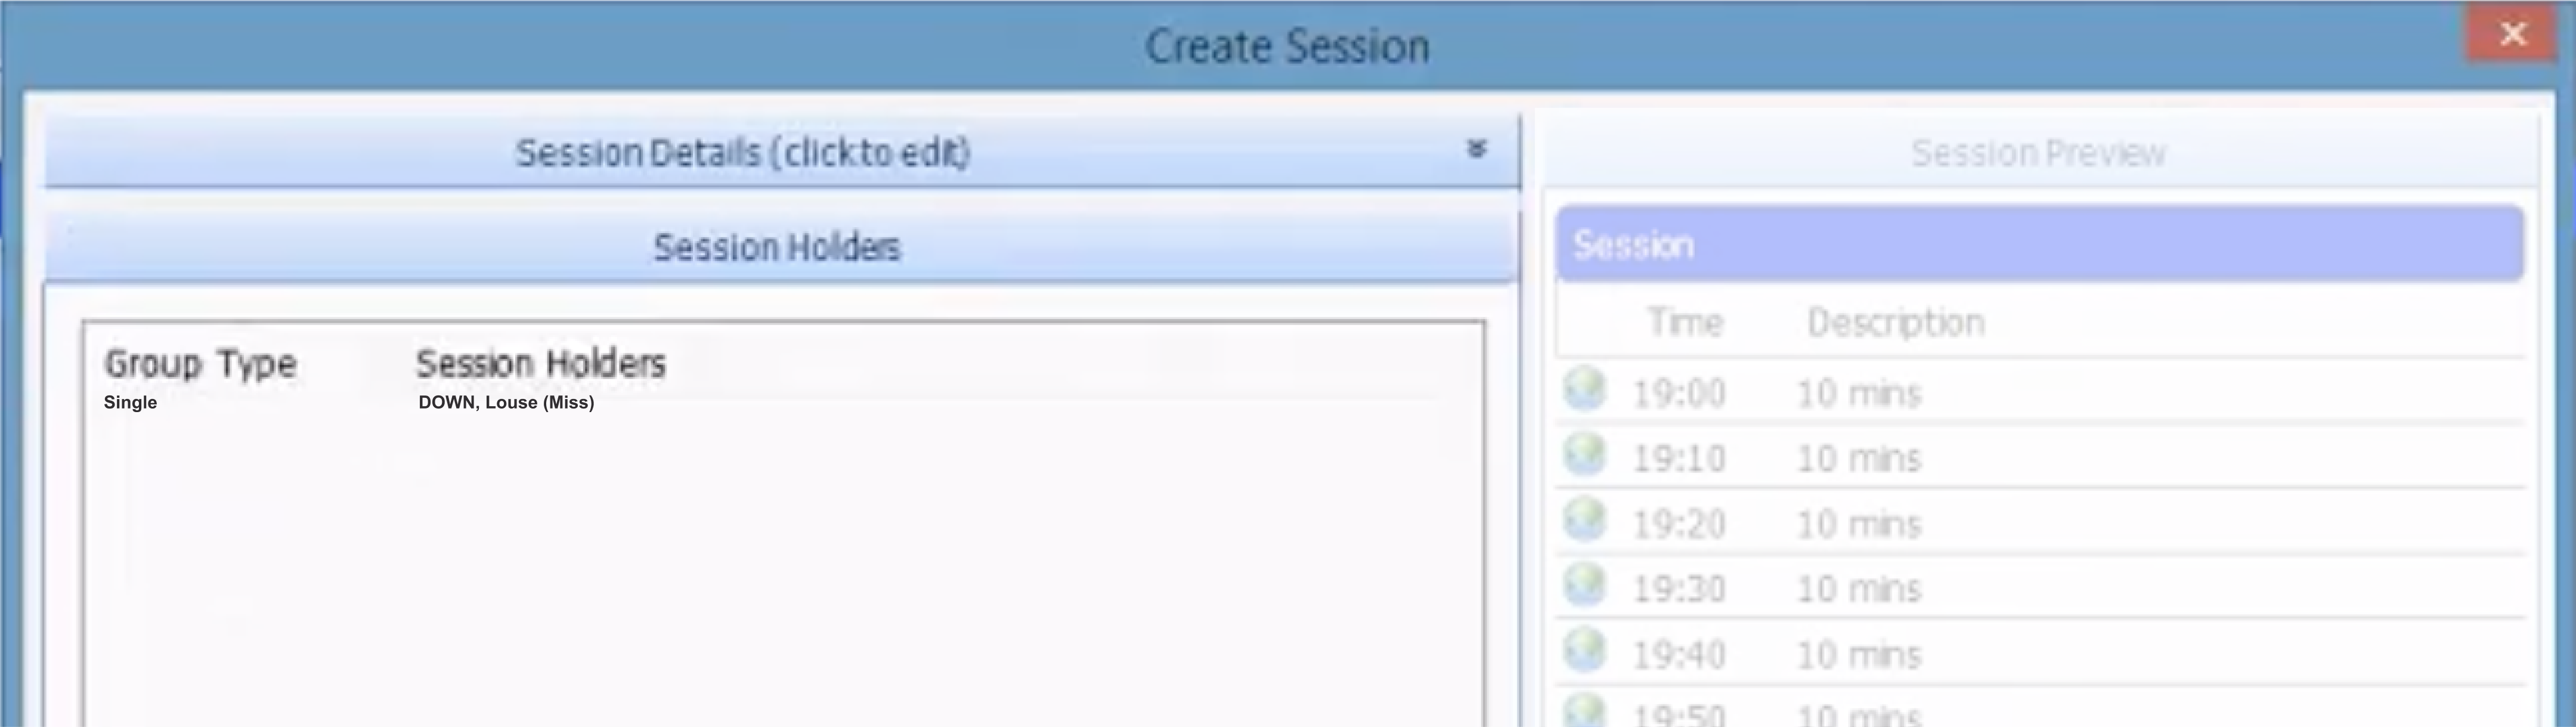
4.4.2 Select 'Session Holders' and add the clinician that you want for the session
Remember that this session holder needs to have their specific GP Connect settings set up, as we did above in step 3, 'Set up the Clinician Role'.

4.4.3 Click 'Session Details'. Here you can now set all or some of your slots to 'GP Connect bookable'
- Set all: Select 'Set all'
- Set a selection: Highlight different slots on the right of the screen and right click on them, followed by clicking 'Slot Properties'.

4.4.4 Slot property settings
- Slot type: Set it to the one you've created for these appointments
- Externally bookable: Set to 'No'
- GPConnect Bookable: Must be ticked
Click 'Apply and Close' and you will see those slots are now set as GP Connect Bookable.

4.4.5 Add up how many appointment slots you have set available for GP Connect Bookable in this session and note it down
This is because we need to apply a filter to ensure that NHS 111 and other organisations cannot book into these specific slots.
4.4.6 Click on 'Apply Filter' found under 'All slots GP Connect bookable'

4.4.7 Set up filter
- Filter type: Select 'Organisation Group'
- Name: Search for the organisation group we have created in step 2.3 'Fill out details'
- Number of slots: Input the number of slots that are set for GP Connect bookable in this session - these are the ones you have just noted down. This is essential to make sure NHS 111 do not accidentally book Appt Health reserved slots
- Kind: Select 'Reserve'
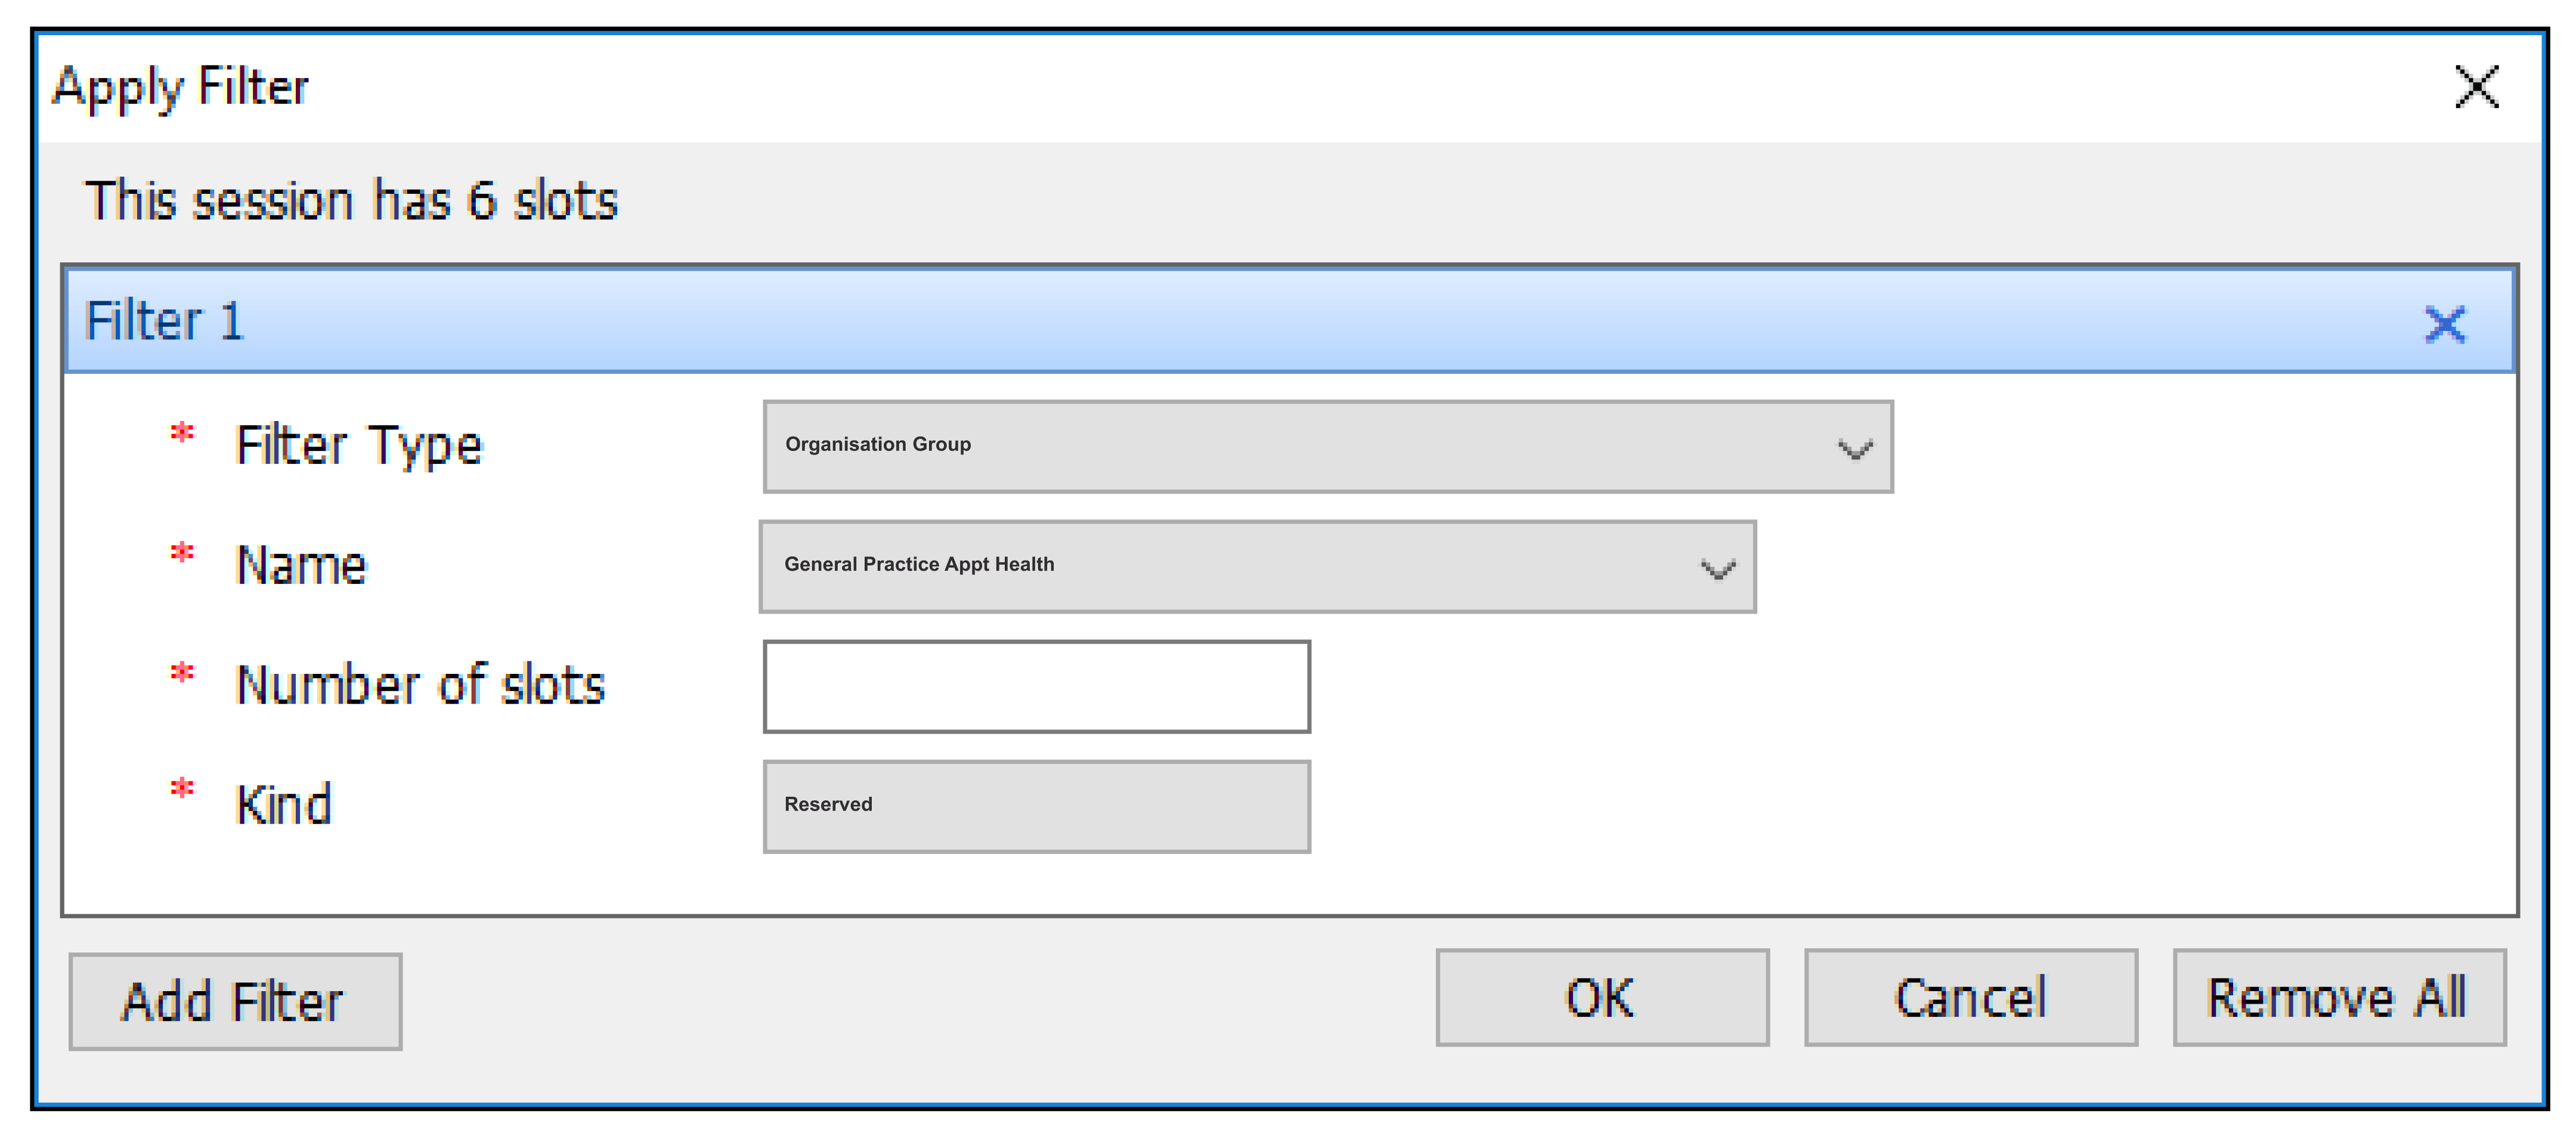
4.4.8 Click 'Ok', 'Save template' then 'Ok' again to save your changes
You have now completed setting up a slot type and you can now skip to step 5.
4.5 Option 2: Editing an existing session
4.5.1 Click on 'Load from Template' at the bottom
4.5.2 Check that the session holder has the specific GP Connect settings set up as we did in step 3 'Set up the Clinician Role'
4.5.3 Click 'Session Details'. Here you can now set all or some of your slots to 'GP Connect bookable'
4.5.4 Set all: Select 'Set all'
Set a selection: Highlight the different slots on the right, right click on them and click 'Slot Properties'

4.5.5 Slot property settings
- Slot type: Set it to the one you've created for these appointments
- Externally bookable: Set to 'No'
- GPConnect Bookable: Must be ticked
Click 'Apply and Close' and you will see those slots are now set as GP Connect bookable.

4.5.6 Add up how many appointment slots you have set available for GP Connect bookable in this session and note them down
This is because we need to apply a filter to ensure NHS 111 and other organisations cannot book into these specific slots.
4.5.7 Click on 'Apply Filter' found under 'All slots GP Connect bookable'
4.5.8 Set up filter
- Filter type: Select 'Organisation Group'
- Name: Search for the organisation group we have created in step 2.3 'Fill out details'
- Number of slots: Input the number of slots that are set for GP Connect bookable in this session - these are the ones you have just noted down. This is essential in ensuring that NHS 111 don't accidentally book Appt Health reserved slots
- Kind: Select 'Reserve'

4.5.9 Click 'Ok', 'Save template' then 'Ok' to save changes
You have now completed setting up a slot type!
Step 5: Add slot type to a target in Appt Health
Now you are ready to return to the Appt platform. On ‘Create target’ on your Appt Health platform, you should be able to find your slot type in the dropdown menu. If you are not able to find it, click on the ‘Refresh’ button.

If you need any help, don’t hesitate to contact support support@appt-health.co.uk.